This post shows how to create Christmas lights in Xcelsius by using just a couple components. The two components used in this example are the Push Button and Play Control component. Just five formulas were written in the spreadsheet to alternate the colors and create “blinking lights”. These formulas are all based on the Data cell in the Play Control component.
Adding Hex Codes
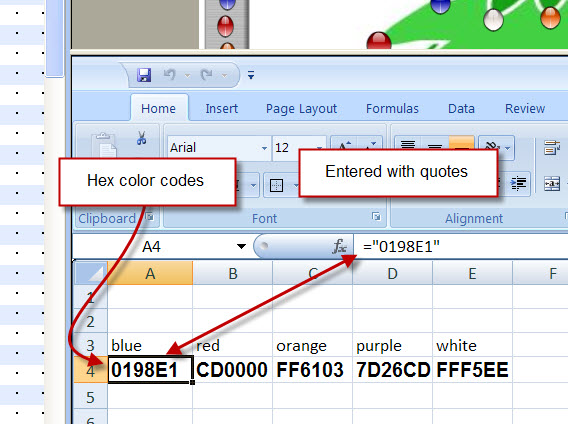
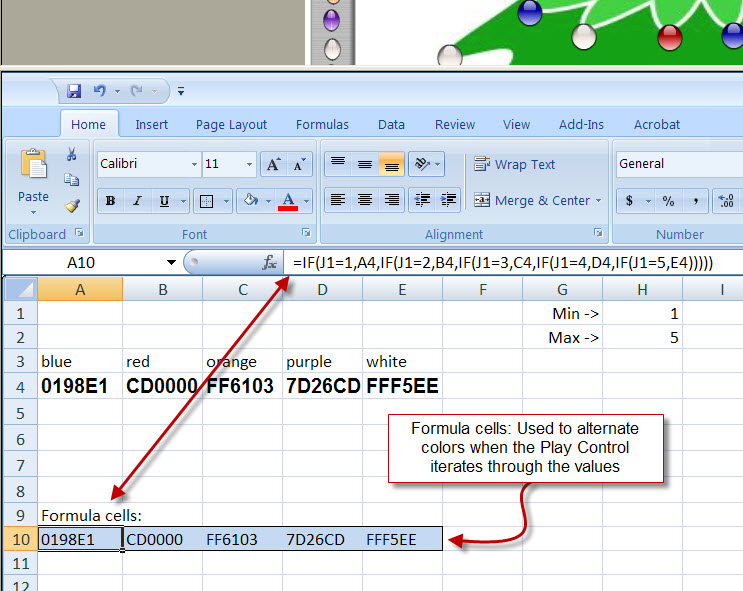
In this example, I used five colors for the alternating lights and listed the hex codes in the spreadsheet. These codes were entered and labeled in the spreadsheet. Be sure to add quotes around the hex codes when entering them. See the screenshot below.
Setup the Play Control Component
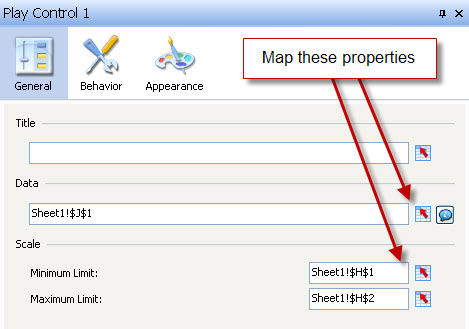
The next step is to add and setup the Play Control component. Drag and drop the Play Control component onto the canvas then map the Data and Scale property values to values in the spreadsheet.

Setting up Properties
Set the Minimum Limit to 1 and since we’re using five colors, set the Maximum Limit to 5. I included both 1 and 5 in the spreadsheet then mapped to them. Next, set the Data property by selecting a cell in the spreadsheet.
Color Coding
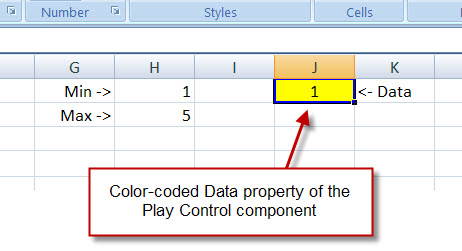
A best-practice is to color-code input cells in the spreadsheet and also include a temporary value. The screenshot below shows the cells that the Play Control component are mapped to (from the General tab of the component).
Play Control Behavior
An important step in the Play Control component is to click the Behavior tab and set the Play Time to 1 second. Also be sure to check the following Play Options:
- Auto Play
- Auto Rewind
- Auto Reply
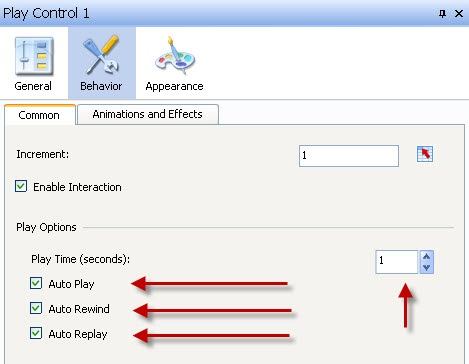
These three settings work together to force the Play Control to continually run. The purpose of the Play Control component is to increase the value in the Data cell. The value placed in the cell will be between the minimum and maximum value previously set. The value will increment by 1 and will Auto Rewind and Auto Reply (because of the previous settings).
Changing Hex Codes with Formulas
With the settings we’ve setup so far, cell J1 will continually count from 1 to 5, restart after hitting 5. In the next step we’ll write a formula that changes the Hex color code when the value in J1 changes.
Here’s the syntax for the first formula: =IF(J1=1,A4,IF(J1=2,B4,IF(J1=3,C4,IF(J1=4,D4,IF(J1=5,E4)))))
This code says, if J1 equals 1, then return the first Hex color code. If J1 equals 2, then return the second Hex code. The formula continues on through J1 = 5. By writing this formula, the Hex code in the formula cell will continually change as J1 changes (thanks to the looping action in the Play Control component).
The next thing I did was create four new formulas with slightly different conditions to show five different hex codes at all times. Observe the pattern and differences in the five formulas listed below.
- =IF(J1=1,A4,IF(J1=2,B4,IF(J1=3,C4,IF(J1=4,D4,IF(J1=5,E4)))))
- =IF(J1=1,B4,IF(J1=2,C4,IF(J1=3,D4,IF(J1=4,E4,IF(J1=5,A4)))))
- =IF(J1=1,C4,IF(J1=2,D4,IF(J1=3,E4,IF(J1=4,A4,IF(J1=5,B4)))))
- =IF(J1=1,D4,IF(J1=2,E4,IF(J1=3,A4,IF(J1=4,B4,IF(J1=5,C4)))))
- =IF(J1=1,E4,IF(J1=2,A4,IF(J1=3,B4,IF(J1=4,C4,IF(J1=5,D4)))))
The screenshot below shows how the five formula fields used to change the hex codes appear in the spreadsheet.
Note
After setting up the Play Control component, move it to the back layer behind all components so it will not be seen. An easy way of doing this is to select the component and hold down the minus symbol until it’s at the very bottom layer.
Adding Blinking Lights
The final step is to add the blinking lights. Each light is actually and individual Push Button component - mapped to one of the five formulas previously described.
- Begin by adding a Push Button component to the canvas
- Adjust it to the shape you prefer
- Select the component then remove the word Push from the component’s Label value
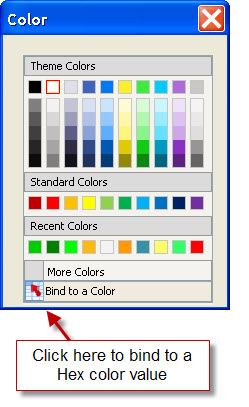
- Next, click the component’s Appearance tab followed by the Color tab
- Change the Default color and Pressed color (pictured below)

- Select ‘Bind to a Color’ and select your first formula with a hex value (pictured below)
- Copy and paste the component four times
- Bind each of the new components to the four remaining hex code formulas
All that’s left now is to copy and paste the 5 existing Push Button components many times and place them appropriately on the canvas. That’s it! Blinking Christimas lights with Xcelsius!
Please let me know if you have any questions.
Thank you!

Pingback: Tweets that mention Christmas Lights with Xcelsius – MyXcelsius.Com -- Topsy.com()